Tuesday, September 29, 2015

How To Convert A WIM To ISO


  1. Download the Windows Automated Installation kit from microsoft.com/downloads/. While the file downloads, ensure that the WIM file from which you wish to make an ISO is located in the root c:/ directory. (Name it discovery.wim for ease of use.) When the Windows Automated Installation has downloaded, follow the prompts to install the software.
  2. Open the Deployment Tools Command Prompt Open the Start Menu in Microsoft Windows and click "All Programs" then "Microsoft Windows AIK". The Command Prompt is in this folder.
  3. Open a Windows Preinstallation Environment and copy the WIM file into it; do so by typing "CopyPE C:\Winpe" to create the environment, then "Copy /y c:\discover.wim c:\Winpe\ISO\Sources" to copy the file into the environment.
  4. Navigate back into the PETools folder by typing "Cd C:\Program Files\Windows AIK\Tools\PETools".
  5. Type "Oscdimg -n -bc:\winpe\ISO\boot\etfsboot.com c:\winpe\ISO c:\.iso" to create an ISO image from the contents of the Preinstallation Environment (your WIM file).

  6. * Alternatively, if the WIM image to be converted to ISO is larger than a standard CD (700 MB), type "Oscdimg -m -bc:\winpe\ISO\boot\etfsboot.com c:\winpe\ISO c:\winpe.iso" at Step 4.
  7. Make a disc from your ISO image using a utility that can burn CD or DVD media.

Source: http://vcommunique.blogspot.com.au/2010/07/how-to-convert-wim-file-to-iso-file.html

Saturday, March 21, 2015

Disable YouTube's New Autoplay

YouTube had brought in a new Autoplay option that plays the next video on the list on the right hand side.

To disable this, at the top of the relevant videos list, a switch with a white tick on blue background should be displayed. Click this to turn Autoplay off.


Monday, March 2, 2015

Changing Windows RDP Port

To change the port that Remote Desktop listens on, follow these steps.

  • Start Registry Editor.
  • Navigate to: HKLM\System\CurrentControlSet\Control\TerminalServer\WinStations\RDP-Tcp
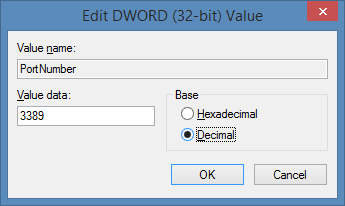
  • Double click on PortNumber


  • Click Decimal
  • Type the new port number (40000), and then click OK.
  • Quit Registry Editor.
  • Restart the computer.
  • Note: When you try to connect to this computer by using the Remote Desktop connection, you must type the new port. 
    Example chmmr.*.*:40000.

    HP Laserjet P2035 - Factory Reset.

    To factory reset a HP Laserjet P2035, follow the steps below
    • Turn off the printer
    • Hold down both Go and Cancel buttons.
    • While holding down buttons turn printer back on
    • The printer should boot up and all lights will appear at the same time.
    The printer should be now factory reset.

    Thursday, February 19, 2015

    Enabling WOL On Windows 8 Machines

    Assuming that the machine has the latest drivers, in order to enable WOL, Turn On Fast Startup must be disabled.
    • Open Power Options.
    • On the left hand side, click Choose what the power buttons do.
    • Click Change settings that are currently unavailable.
    • Untick Turn on fast startup (recommended).
    WOL should now work.

    This is because this option disables the network card when it turns off the computer. You can look at the back of your machine where the network card is located and see if it is blinking. If it is, the option has fixed the issue.